The only knife sharpening tutorial you’ll ever need
Do you have and old knife that is so dull it struggles to cut butter? Let’s fix that. I’ll show you all the equipment you need, the basic concepts, and how to sharpen a knife step by step. We’re going to keep this simple and save things like lapping stones and bevel angles for another day. With a little practice, anyone can hand sharpen.
Heads up: Some of the links below are Amazon affiliate links. If you click through and buy, I earn a small commission at no extra cost to you. I only recommend tools I use, trust.
The concepts
Just relax and take your time
Sharpening is simple. Take your time. Don’t think a good time to learn to sharpen is 4pm Thanksgiving day. Make sure you have plenty of time and you are feeling fresh. If you feel yourself getting tired, dry off your knife and take a break. Don’t mess up you knife when you can just come back later.
Take as few passes as possible
Every pass over the stone is an opportunity to mess up your bevel. But why, you might ask, should beginners use coarse stones? Wouldn’t a coarser stone cause more damage with a messed up pass? Yes, actually. Most people can make they first couple passes good enough. Nobody has a good 40th pass their first time sharpening a knife.
Taking one perfect pass is easy enough. Taking 400 is another story. Especially as a beginner. Use as coarse of a stone as you have and is necessary. Taking out a giant chip? Maybe use a 120 or 320. Touching up a razor? Maybe take a couple passes on a 15k stone.
Equipment
If you really want to you can try using a brick or the bottom of your coffee mug. Do yourself a favor and get a decent stone to start and stay away from high grit stones. You don’t need a collection but if helps if you play to your stones strengths. If you just have a 1000 grit stone you are in good shape. But don’t let your blades get too dull or collect chips. If you have heavier work to do, don’t be afraid to get a 120 or 320. It’ll be a rough edge if that’s your stone. But it’ll make your work easier and it’ll still cut.
Things you probably have
Sharpie or other waterproof marker
Paper towel
Spray bottle filled with plain water
Tub for soaking stones soaking traditional water stones
drawer liner keep your stones from sliding
Piece of wood or block of felt for deburring
Things you might not have
I highly recommend springing for Shapton pro ceramic stones. They stay flat for a long time and you don’t have to soak them, they come with cases, and they are color coded. Alternatively if you want to get started as cheap as possible with more than one grit, King combination stones are worth a look. Unless you are going to sharpen blades for a living, skip the Shapton ‘glass’ stones. They stay flat even longer but are almost double the price.
Shapton pro 1000 grit - great standalone stone
Shapton pro 320 grit - getting chips out
Shapton pro 120 grit - setting bevels/getting chips out. If you have aspirations to make your own blade this is absolutely the route I would recommend.
Shapton pro 5000 grit - unless you have hundreds of dollars burning a whole in your pocket, this is as high of grit as I would go for general use.
King combination 1000/6000 stone save space and save some money. Needs soaked and will need flattened sooner than the shapton stones
Let’s get sharpening
Get your stones ready
Traditional water — soak them in a tube of water for 5-10 minutes before use.
Ceramic stones — give them a couple of spritzes of water and you are ready to go.
Not sure what kind of a stone you have? Give them a couple squirts with your spray bottle. If the stone immediately soaks up the water it is a traditional stone. If the water sits on top, it is a ceramic stone.
Setup up your workspace
Find a nice flat space you don’t mind getting wet. I like to do this on my glass cook top. You can also use a boot tray or something similar. Then lay out your drawer liner. The Shaptone stone boxes have rubber feet, but mine still tend to side one I start getting water everywhere.
Basic technique
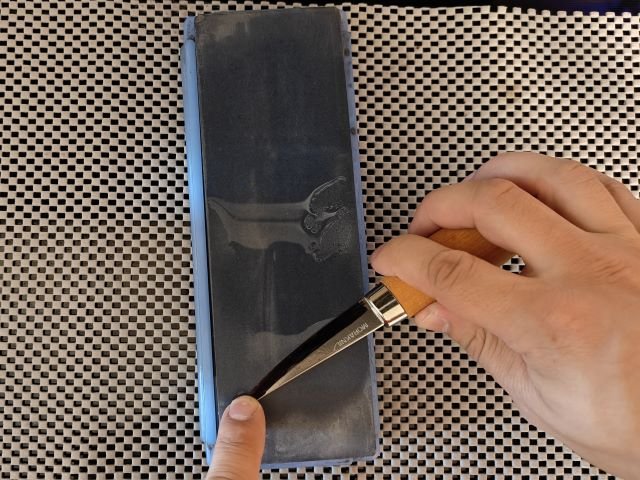
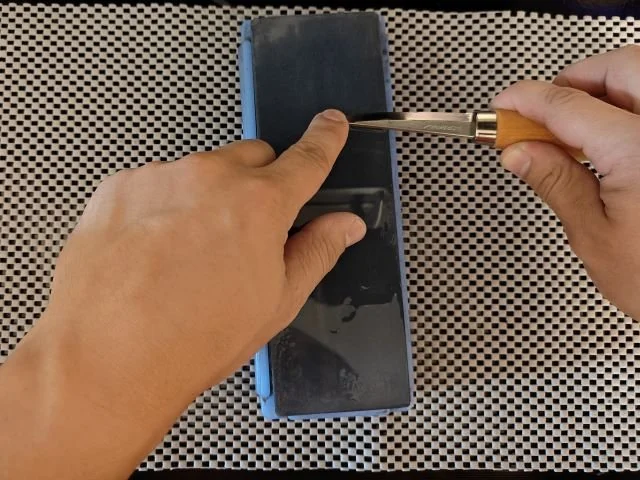
Spritz your stone with water. With the knife edge facing away from you, and lay it flat on the stone. Rock the knife slowly forward to find the bevel. If you need to rock it back and forth a couple times. Lock the bevel angle into your wrist,
Take an arcing pass starting at the bottom of the stone with the heel of the knife move to the top of the stone with the tip of the knife. Lift up the knife and start again from the bottom of the stone to the top only moving forward. If your stone starts to dry out, give it another spritz.That’s all there is to it!
Get out chips and make sure things are flat

Take a marker and cover the whole bevel. Pull out your coarsest stone (120-320 grit if you have chips or 1000 grit if you don’t) and start making passes, alternating sides every handful. Before you change sides, look at the bevel. Is there marker left? Keep working until all of the marker and/or chips are gone. Look at the edge straight on. Are there any shiny spots? If so keep going until they are gone.
Once you feel a a small lip (called a burr) along the whole length of the blade you can deburr and call it a day. BUT, if you have more stones this is the time to pull them out.
Note: make sure you wipe off your knife before moving up grits.
Make the scratches smaller and smaller
This is how we get really sharp. Rinse and repeat moving one-by-one through all of your stones from coarsest to finest (ex. 320 grit > 1000 grit > 5000 grit). You can apply more marker before starting with a new stone but it isn’t necessary. The goal is to replace all of the previous grits scratches with the newer, finer scratches of the finder grit. The bigger the jump in grit the more passes you need to take.
Deburr

If you just keep going back and forth all you are doing is flipping the burr form side to side. Let’s get rid of it. Once you have a burr on both sides with your final stone draw your knife across a piece of wood or a block of felt. Then take a couple more passes across your stone on both sides. Go back and forth between your wood/felt and the stone until you can no longer feel a burr on either side.
Congratulations! You now have a sharp knife.
Progress, not polish.
Thanks for stopping by. I share guides, tools, and lessons from the work. Stick around, dig in, and feel free to share what’s worked for you.
Keep showing up. It’ll pay off.
— Ryan
Alder Branch Homestead